
The GL-AR150 is a mini router with specially adapted firmware based on OpenWRT. It improves the internet connection in the students' apartments. It sets up a local network segment limited to the room and is responsible for setting up the VPN tunnel for the connection to the internet. The local network segment can be used wired or wireless via a special WLAN SSID.

Prerequisites
The router is provided by the university and remains the property of the university as a part of your room equipment. For your part, the following conditions must be met:
- Reset-Button: If you have just moved into the room and are using the router for the first time, you should first press the reset button for about 10 seconds while the device is connected. This will delete all data from your predecessor and you get full access to the device.
- DV-Benutzerkennung: The connection to the university network will be established via OpenVPN, where you have to authenticate yourself with your DV-Benutzerkennung. All members of the university receive a DV-Benutzerkennung from our Servicedesk Campus-IT. More detailed regulations can be found on our website.
- Network Cable: You will need at least one, or, depending on your requirements, several network cables. Please ensure a minimum quality according to Cat. 5e. You get a rich selection e.g. searching for rj45 cat5e slim. Slim cables are flat network cables with flexible bending radii and therefore ideal for the desk area at home.
- Mini-Switch (if required): The router only offers a wired connection for one terminal. If you need more connections, you'll need a small switch. Corresponding models are available with 5, 8 or even more ports at prices starting at approx. 10€.
- Router-Firmware: Each mini router in the students' apartments has a specially adapted and individual firmware by the FRA-UAS for the best possible WLAN settings, as well as easy operability. In order to guarantee the functionality of the mini router, it is not allowed to make any changes to the firmware by yourself e.g. by installing a manufacturer's own firmware.
Establishment
Connection to the FRA-UAS network: Make sure that the GL-AR150 is connected to the data socket of the FRA-UAS network via the network cable on the socket marked WAN. This should have already been done with the initial setup. The router is also being powered via this connection.
Configuration of the GL-AR150: In order for the router to work, you must perform at least two steps:
set an administration password to protect your data and the local network environment, and
Enter your DV-Benutzerkennung for setting up the VPN tunnel.
This is done via the router's WEB interface, which can be accessed wired or via WLAN:
wired: Connect a PC or notebook to the router's LAN port using a network cable. Use the adapter setting on the PC/notebook to ensure that the IP address will be automatically assigned (DHCP). Restart the network interface of the PC/notebook if necessary. You should get a local IP address between 192.168.8.1 and 192.168.8.254.
Wireless via WLAN: Open the wireless connections on your PC/notebook and connect to the wireless network specified on top of the device (SSID). When establishing a connection, a password is requested, enter here the PW: ..., which you will also find on top of the router.
In both cases you can then open the web browser of your PC/notebook ( e.g. Chrome, Firefox, Safari, etc.) and connect to the administration interface of the router: Just type the following line into the address bar of your browser:
http://192.168.8.1
It usually takes a short moment until the configuration page has loaded. A login screen will appear, indicating that no 'root' password has been set yet:
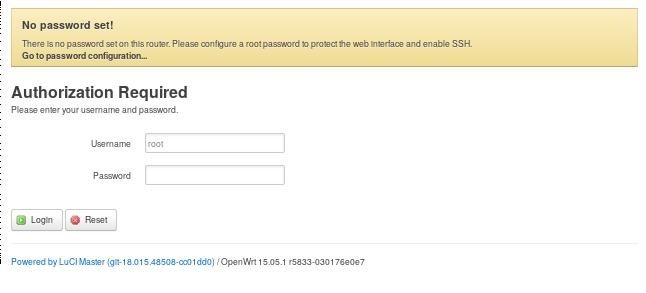
Please first click on Login without specifying a password and then follow the link in the colored information box; alternatively you can also access the page for entering passwords via the tabs "System => Administration"
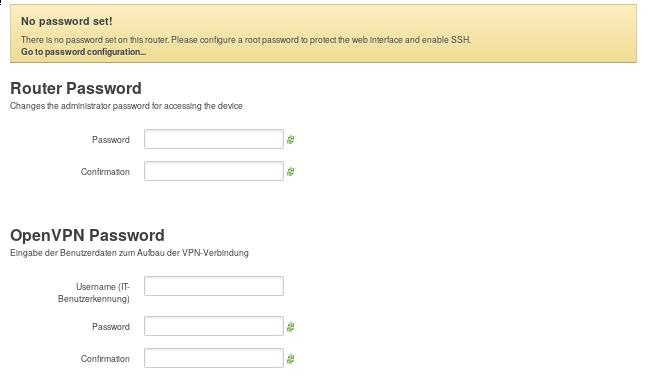
First enter a new sufficiently complex router-password, it protects access to the router and must be entered for authentication the next time you want to log in. Keep the password safe at all times.Unter OpenVPN Password tragen Sie bitte die Informationen zu Ihrer DV-Benutzerkennung ein, diese Afterwards please enter your DV-Benutzerkennung into the category OpenVPN Password. This information is required for setting up the VPN tunnel. The password must be entered twice to avoid typos.
ATTENTION: Scroll down to the end of the page and confirm your entries by clicking the button "Save & Apply" - otherwise your entries will be lost and you have to retype the passwords again.

The page will now refresh and should show you the following confirmation; otherwise, follow the hint and repeat the previous procedure:

Entering the DV-Benutzerkennung also restarts the OpenVPN tunnel. Only now an internet connection will be possible. You can easily check if the setup was successful under "Status => OpenVPN Log":
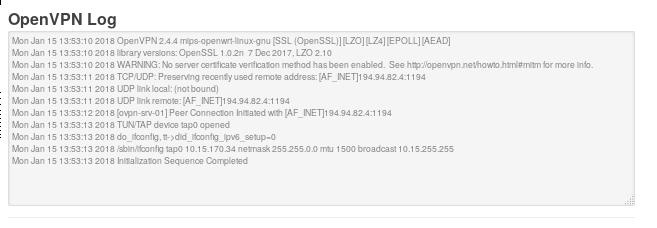
The last line is essential - it signals the successful construction of the tunnel. This allows the forwarding of the local data traffic to the internet and completes the configuration - Congratulations!
Finally, you should definitely change the WLAN password, called PreShared key - to protect your local infrastructure. The default password can be found on top of the device to enable initial configuration via WLAN, but can also be easily read by third parties. You can change the key in the web interface under "Network => Wireless":
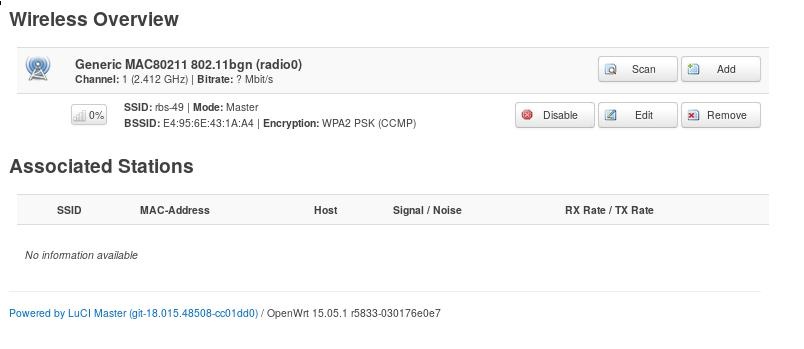
Here you can see the WLAN network your router is using - the SSID is slightly different from the display. Now click on Edit and go to the section Interface Configuration:

And then go to Wireless Security:
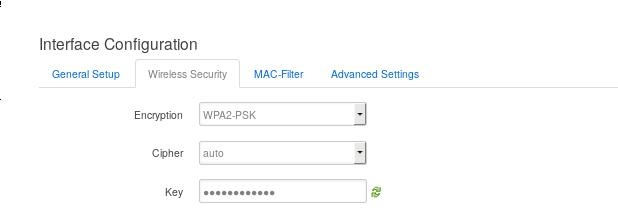
Enter your new WLAN password in the field Key. Follow the usual recommendations for assigning passwords (at least 8 characters, preferably upper and lower case letters as well as numbers and special characters) and save your changes with the button "Save & Apply" at the bottom of the page. Please do not change any other settings here, the settings are optimized for the room situation in your particular environment.
To the end: When moving out of the students' apartments, the router remains in the room and is available to the next tenant. For this situation please perform a Factory Reset as the last action on the router, which resets all individually changed settings. Just press the Reset button for approx. 10 seconds and then release. Shortly afterwards, the small LEDs flash and the router restarts. You can check the success of the action when you connect to the router for the last time - the web interface should display again a hint that the root password has not been set (see above).
Troubleshooting - What to do if it doesn't work out straight away
Hint: The following suggestions for troubleshooting may require further network setting knowledge of the devices. If you are not able to get any further with these hints, perhaps a friendly neighbour or - in any case - the FRA UAS service desk can help.
Problem: No connection to the router
Check whether the network cable between the administration computer and the router is plugged in correctly, pay attention to the term LAN on the router!
Check whether the local firewall is blocking the connections.
Check the network settings of the administration computer: either the dynamic address assignment must be activated here (recommended!) or a static address from the network area 192.168.8.0/24, e.g. 192.168.8.10.
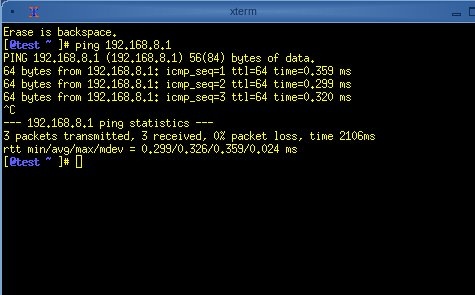
Check the connection to the router: Open a console on the administration computer and start the command ping with the router as target (ping 192.168.8.1). An echo should come back.
In rare cases, the router will not activate its built-in DHCP server after a restart/reset. If you are connected to the router and have received an IP address starting with "169.254", this may be the case.
- You have to temporarily assign a static IP address, e.g. 192.168.8.10 to your administration computer. Try pinging the router again from the console (ping 192.168.8.1).
- If the ping has worked this time, you can remove your fixed IP address and activate the dynamic address assignment (DHCP) again. As soon as the router has received a ping, it reactivates its DHCP server.
Problem: VPN tunnel is not established
First have a look at the output listed below Status/OpenVPN Log (see the penultimate picture) - there may be some hints here:
no network connection? Take a look at status/overview/, check whether the WAN connection has received an IP. An IP starting with 10.16 should be displayed under Network. If this is not the case, check if the cable is correctly plugged into the WAN port and connected to the correct wall socket.
no authentication due to wrong password? Check your entries in the DV-Benutzerkennung and reset the password - the OpenVPN connection will then restart automatically.
Problem: Password forgotten - no longer access to the router
Solution: Press and hold the Reset button on the router for about 8 seconds, then release; the LEDs will start flashing and then go off briefly. This will perform a Factory-Reset, which deletes all user entries, including the root password set by you. Then go through the setup process again.